
|
||
| [Contact Us] | ||
Epoxy Joint Filler
Epoxy Joint Filler for Saw Cut Expansion Joints
100% Solids Zero (0) VOC Epoxy Resin
Epoxy.com Product #11
Epoxy Joint Filler for Saw-Cut Control Joints Product #11 is a 100% solids zero (0) VOC, flexible epoxy joint filler for saw-cut joints of concrete slabs on grade, or to repair existing slabs. Epoxy.Saw-Cut Control Joint Filler Product #11 absorbs the impact and shock of heavy loads and steel wheeled traffic, preventing erosion of control joint edges.
ADVANTAGES of EPOXY JOINT FILLER
- High elongation
- Flexibility provides for joint movement
- Protects slabs edges from chipping
- Cures on damp or wet surfaces
- Field proven reliability
- Good shock absorption qualities
- Zero (0) VOC so it meets even the strictest Low VOC standards
SURFACE PREPARATION EPOXY SAWCUT RESIN
Surface to receive Epoxy Joint Filler for Saw-Cut Control Joints Product #11 must be clean and sound. Remove all dirt, laitance, grease curing compounds and other foreign matter by sandblasting, or mechanical abrasion. Remove water and dust from all surfaces with an oil-free blast immediately prior to application.
MIXING INSTRUCTIONS EPOXY RESIN + HARDENER
Temperature of Epoxy Joint Filler for Saw-Cut Control Joints Product #11 must be 50 degrees F or above at time of mixing. Stir each component separately before blending. Mix one part by weight of Part A with one part by weight of Part B for three minutes with a low speed electric drill motor equipped with a mixing paddle.
APPLICATION - EPOXY SAWCUT JOINT RESIN
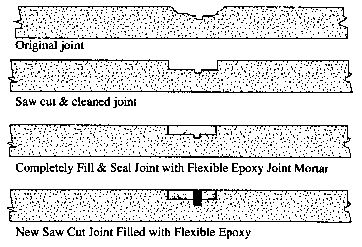
For application on flat surfaces Epoxy Joint Filler for Saw-Cut Control Joints Product #11 can be poured. For vertical surfaces Epoxy Joint Filler for Saw-Cut Control Joints Product #11can be thickened with Product #71. Contact Epoxy.com for more information on the thickening process. This mix of Epoxy Joint Filler for Saw-Cut Control Joints Product #11 & Epoxy.com Product #71 can be applied by power or hand operated caulking gun, by trowel, or with a putty knife, or pumped from one of Epoxy.com' Binary Pumping Systems. In areas where cosmetics are important mask both sides of the substrate before applying the material.
LIMITATIONS - EPOXY JOINT RESIN
Use of solvents for thinning will prevent proper cure. Epoxy Joint Filler for Saw-Cut Control Joints Product #11 should not be installed on new concrete floors until maximum shrinkage has occurred. Generally speaking, this time period is a minimum of 28 days.
Safety Precautions
Prolonged or repeated exposure may cause eye and skin irritation. If contact occurs, wash immediately and seek medical help. Use safety glasses with side shields and wear protective rubber gloves.
Cleaning
All tools and equipment should be cleaned before the system gels. Use MEK, Acetone, or any lacquer solvent.
APPLICATION PROPERTIES @77°F |
|
| Mix Ratio | 1:1 By Volume |
| Viscosity (mixed) | 2,200 CPS |
| Gel Time | 30 minutes |
| Consistency | Pourable liquid |
| Initial Cure | 8 Hours (80% strength) |
| Final Cure | 2-3 Days |
| Packaging (unit size) | 2 gallon per units, 10 gallon per unit |
| Standard Colors | Light Gray, Dark Gray |
| Shore A. Hardness | 70 to 80 |
| VOC Content (grams/liter) | 0.0 (Zero) |
PHYSICAL PROPERTIES |
|
| Artificial Weathering (ASTM G23-75 Type D) |
10-15% elastomeric property change after 1000 hours |
| Bond Cohesion after Water Immersion (Fed. Spec TT-S-00227E) |
No Failure after 25% total movement |
| Tensile Strength (ASTM D-638) | 600 p.s.i |
| Ultimate Elongation (ASTM D-638) | 35% |
| Tear Resistance (ASTM D-624-73) | 20 lb./in |
| Service Temperature | 30 degrees F. to 180 ° F. |
Proper mixing and installation are critical to the success of all products. See Installation Tips, Techdata, and (M)SDS for more details, or contact us with any questions.
321-206-1833 Customer Service – Ordering and Order Status
Katey Lambert-Fontaine – Vice President & Chief Operations Officer
katey@epoxy.com
352-533-2167 Technical Support
Norm Lambert – President & Technical Support Director
info@epoxy.com
Debby Lambert, Co-Founder and Strategic Planning
Website: www.epoxy.com
24-hour Hazmat Emergency Telephone Response Service: 1-800-633-8253
[Home] [Catalog of Products] [SDS] [Online Ordering Authorization Form]